Reindeer Cupcakes

by Sandra Merville Hart

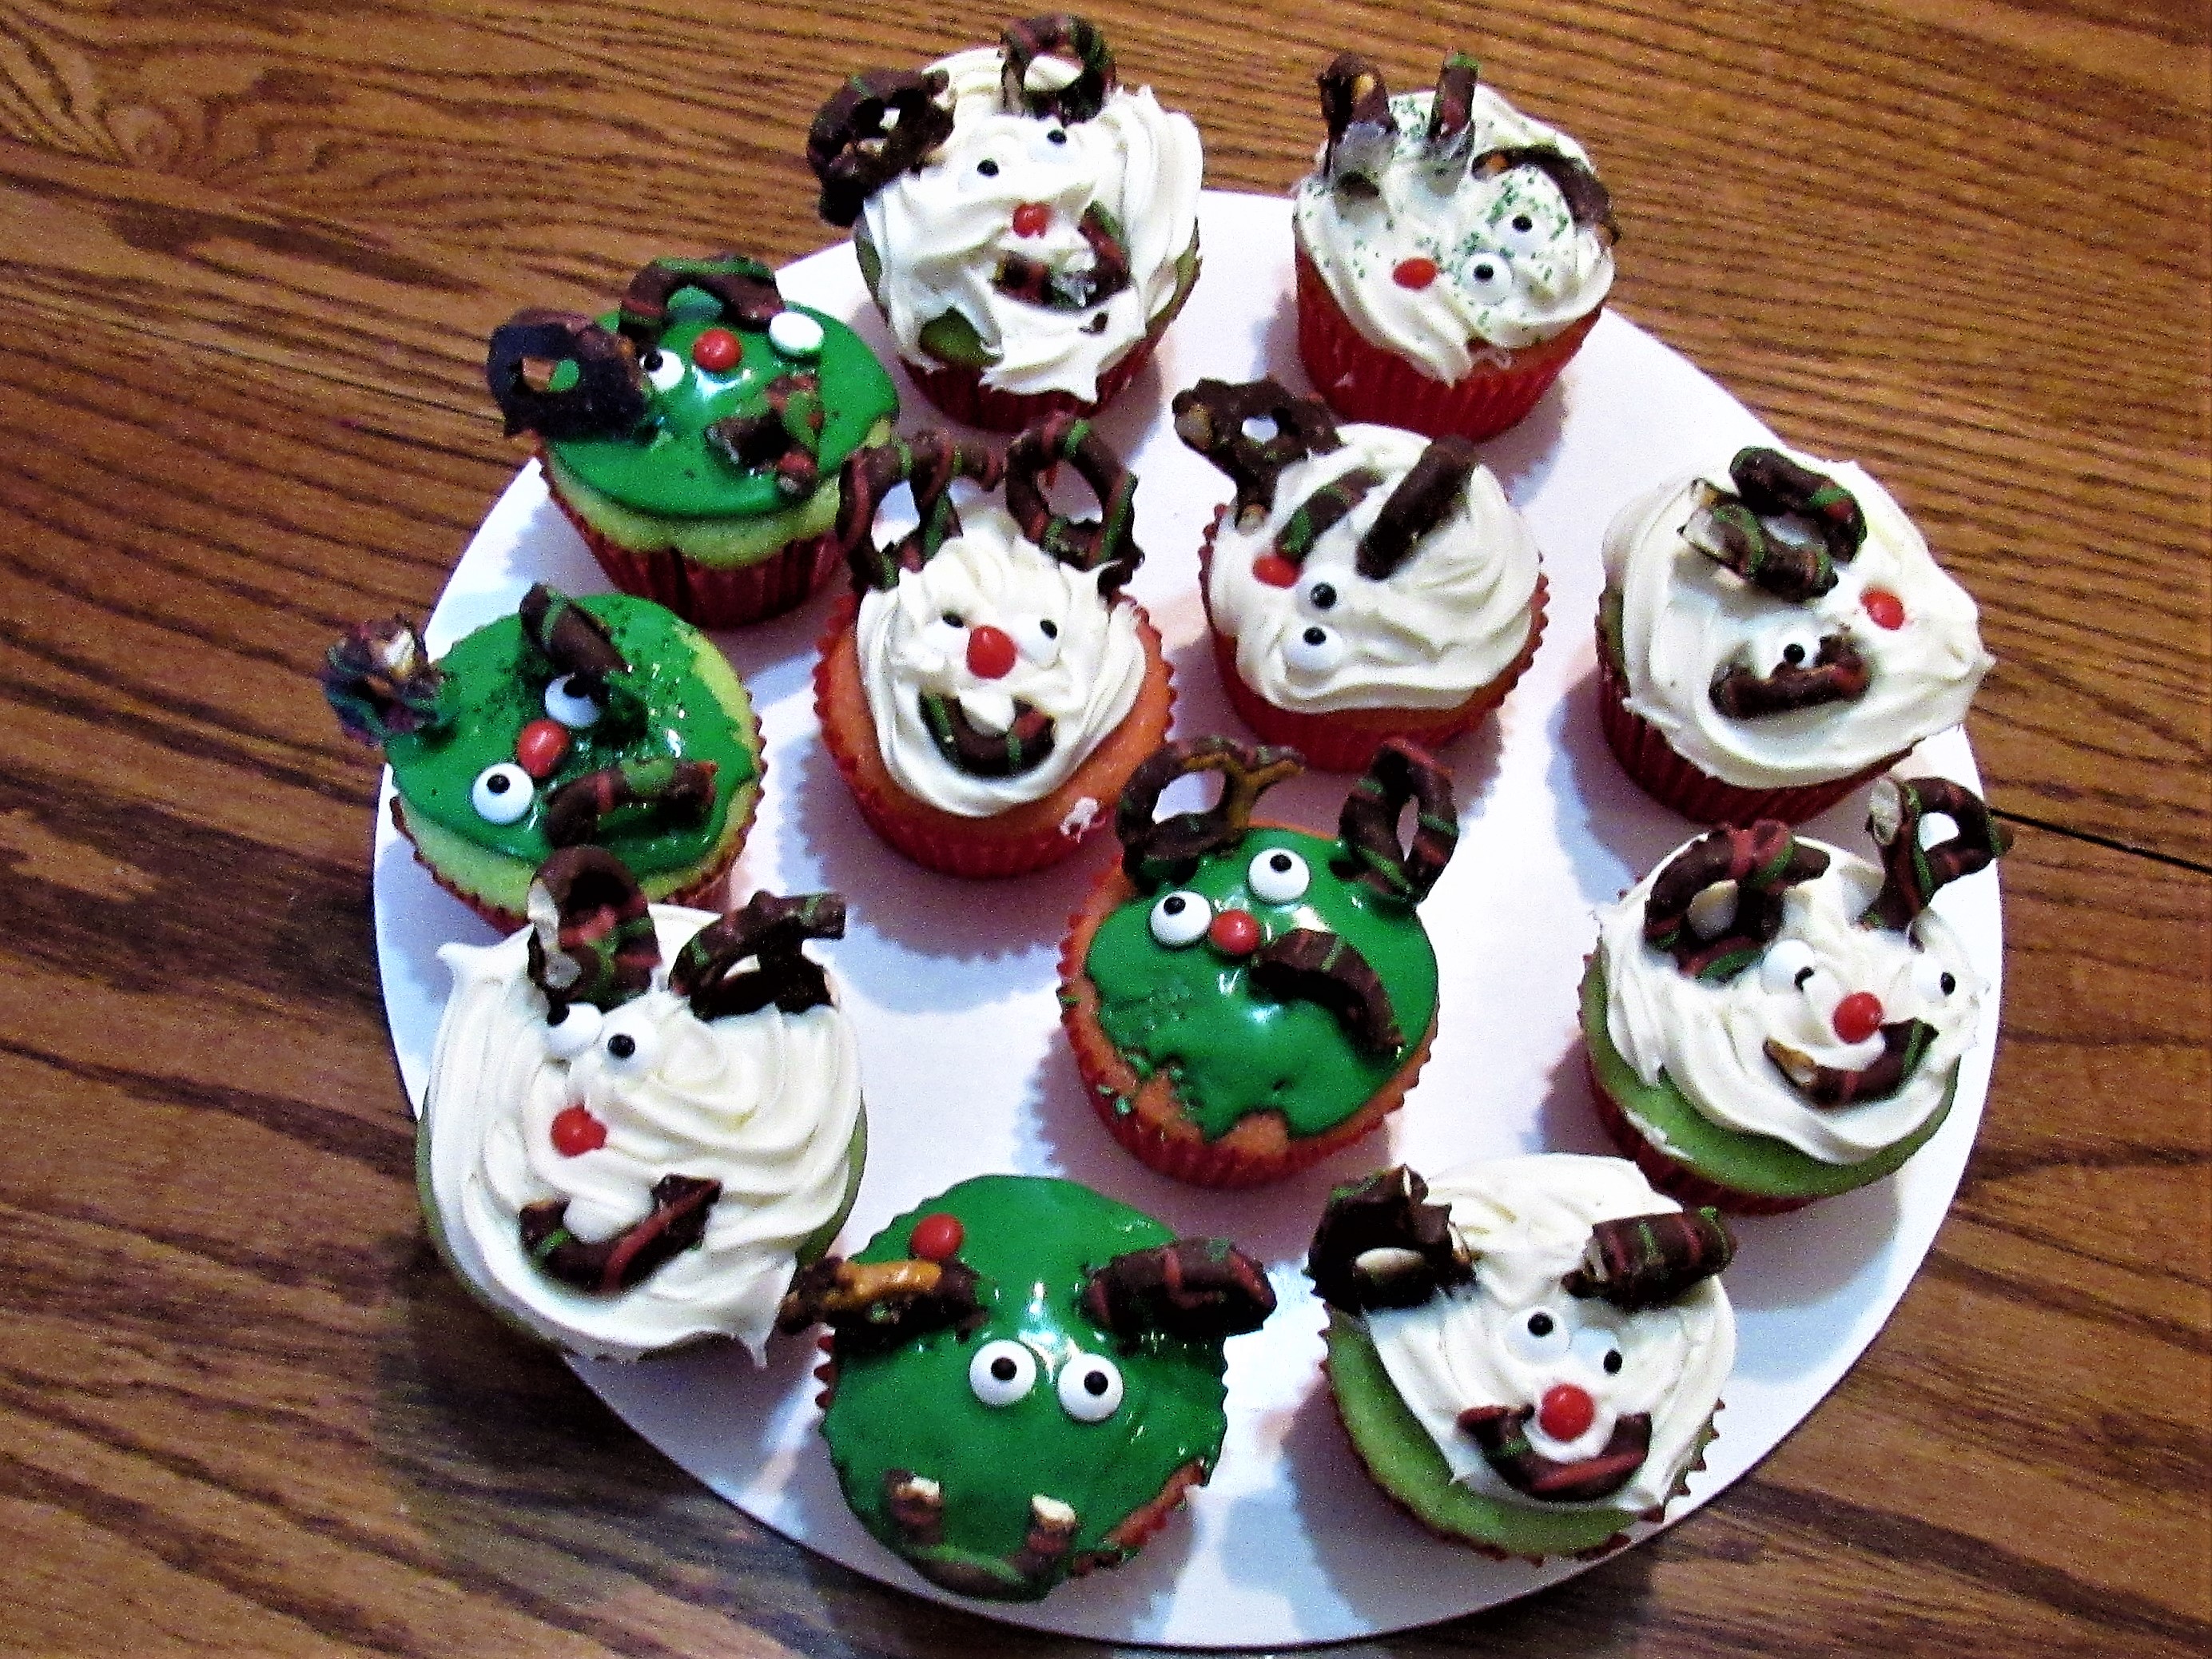
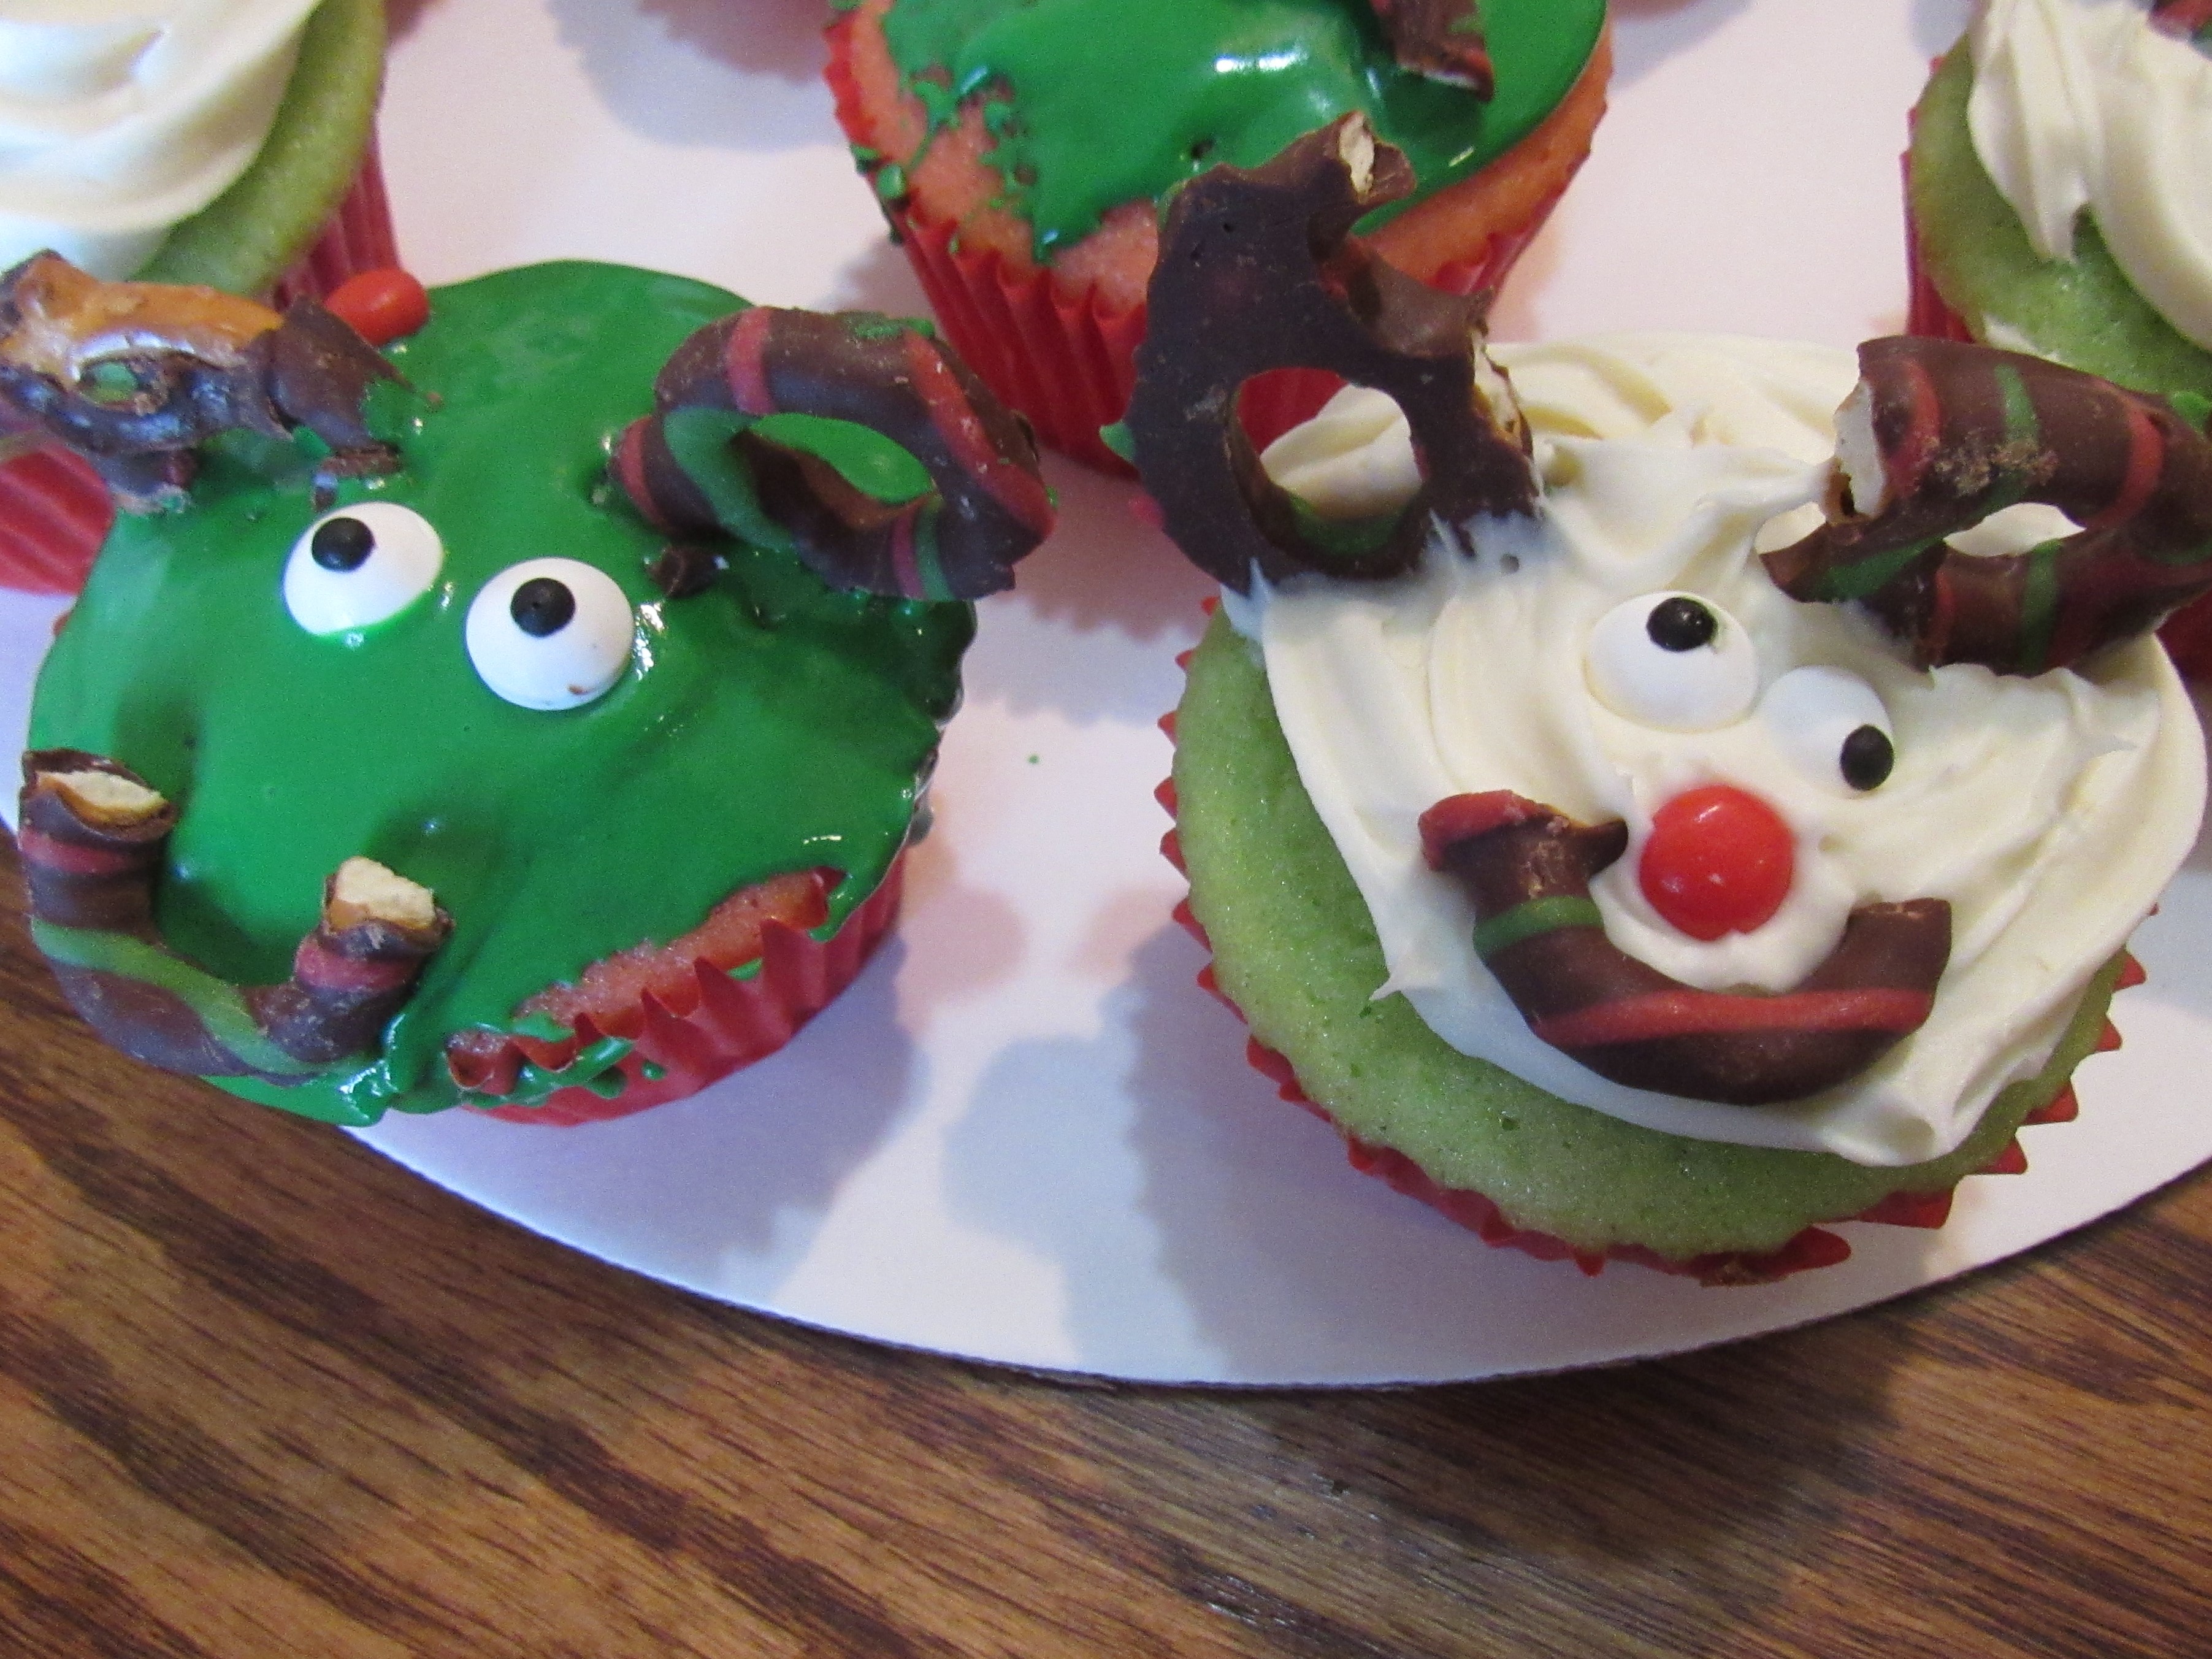
Are you looking for a fun treat to make with the children in your life? These reindeer cupcakes are a lot of fun to create. My two-year-old granddaughter decorated several. For her, getting the nose, eyes, antlers and mouth somewhere on the cupcake spelled success. Her older brother, after making a few with facial features in the proper spots, had a lot of fun making “silly” faces.

Making this a successful adventure required advance preparation. You can do this and have a blast yourself if you plan ahead.

  • If you have young children, make the cupcakes ahead of time. I followed my mom’s yellow cake recipe. Children in elementary school will probably want to help with all of it. Get yourself into the mindset that this will be messy. You can clean up later. Now is the time for organized fun.
  • While the baked cupcakes are cooling, prepare the reindeer “antlers” and “mouth.” Pretzels (I bought festive iced pretzels but the plain ones look more like reindeer) work great for these. Break them into pieces that resemble reindeer antlers and mouths. Older children will probably want to do this for you.
  • Candy eyes are often available at grocery stores. Red imperials cinnamon flavored candies, M&Ms, or chocolate chips make good noses.
  • Prepare icing or buy it. To keep things easy, I bought icing. White icing shows up really well but Christmas colors are also fun.
  • Once the cupcakes cool (I kept them in the fridge for about thirty minutes to make them easier to frost) gather the decorations and the children. Older children will want to frost the cupcakes while the younger ones will likely need adults to do it.
  • Frost the cupcakes one at a time and then decorate immediately. Demonstrate the first one so everyone knows what to do. After that, supervise as needed.

Learn to be flexible with the child’s own creative spirit. They’ll have more fun … and so will you.

What a fun activity for the children in your life! Maybe it will become a family tradition.

Traditional Sugar Cookies

by Sandra Merville Hart

Holiday traditions are a fun part of the season for so many of us. I had been doing different Christmas activities with my preschool and toddler grandchildren. They helped “build” our artificial Christmas tree. They decorated the house with us. We’d watched some holiday shows together and lit Christmas scented candles.

It was time to make Christmas cookies. I made the dough ahead of time from a trusted recipe in my Betty Crocker’s Cookbook.

Traditional Sugar Cookies

¾ cup shortening (I use butter, softened)

1 cup sugar

2 eggs

1 teaspoon vanilla

2 ½ cups all-purpose flour

1 teaspoon baking powder

1 teaspoon salt

Sift together the flour, baking powder, and salt in a separate bowl and set aside.

Blend the butter and sugar together with a pastry blender until thoroughly combined. Add beaten eggs and vanilla until mixed. Blend in the flour mixture.

Cover and refrigerate for at least an hour.

Preheat the oven to 400 degrees. Lightly flour the surface and roll out the dough. Cut into desired shapes. Place on ungreased baking sheet and bake 6 – 8 minutes or until lightly browned.

I selected some cookie cutters that don’t have lots of nooks and crannies for the dough to get stuck in and gave them their choice from those shapes. I demonstrated cutting out the cookies. They did a great job and had lots of fun with this part.

After the cookies baked and cooled, I showed them an easy way to decorate. At 4 and 2, they did a great job. What fun for all of us! Taking turns made it easier to monitor and keep the mess to a minimum.

Of course, they sampled their handiwork and we saved their very first cookies as a treat for Mom and Dad.

Delicious, light cookies made a wonderful Christmas cookie.

What a sweet adventure and hopefully a fun memory for both children.

Sources

Betty Crocker’s Cookbook, General Mills, 1969.

Stew – the Mainstay of Homesteaders

Cindy Ervin Huff, fellow author in “The Cowboys,” shares a recipe from her new historical romance book release. Welcome back to Historical Nibbles, Cindy!

by Cindy Ervin Huff

Stew was a mainstay in the diet of most pioneers and homesteaders. It can be easily stretched to feed a large group of people. And reheated stew has even more flavor than the first day it was served. Because homesteaders had a busy life, it was often easier to set a pot of stew to cook slowly while the womenfolk tended to other chores, such as sewing or doing laundry.

Cooks on cattle drives often made stew. The chuck wagon traveled to the campsite for the day and arrived hours before the drovers. Cooking a large pot of stew over a campfire ensured the crew had a hearty meal at the end of the day.

Stew might consist of a variety of meat such as chicken, beef, lamb, venison and even softened jerky. And any vegetable or herb would be added. Spices might be interchanged due to what was available in the area and the nationality of the homesteader.

Stew was also a mainstay for work crews such as lumber jacks, railroaders, and construction crews. In my newest release, Angelina’s Resolve, the entire community shares a tent kitchen. Buffalo that wasn’t smoked or salted became stew for the week.

Stew has held a prominent place in the culinary history of America even today. Below is a stew recipe that can be modified based on what is on hand.

Drop biscuits were more common than cut ones on a busy day. A drop biscuit is the same recipe as any other biscuit, except the biscuit dough is dropped from a spoon on the baking sheet or cast-iron pot and baked. The shapes are irregular but the flavor is the same. Stew is usually served with some type of bread. Biscuits like stew were the go-to preference for getting a meal out quickly. Especially on the trail.

Meat Stew

Choose any type of meat available, such as chicken, beef, lamb, or wild game. Cut meat into pieces and dredge in flour. Then in a Dutch oven or other large pot, cook the meat in lard until browned on all sides.

Then add water, enough to cover the meat but not to the rim of the pan. Add salt if meat is not already salted. Chop your choice of vegetables into small pieces.  Once the water is boiling, add the vegetables, then push the pot to the back of the stove to slowly cook. Stir occasionally to prevent burning to the bottom of the pan. The more people you are serving, the more vegetables you should add to stretch the stew. Add water as needed. Season with any herbs you like. This stew can be cooked in a shorter time by leaving it on the hotter part of the stove or over a campfire. Stew is done when vegetables are soft. Serve with bread, biscuits or cornbread.

About Cindy

Cindy Ervin Huff is an Award-winning author of Historical and Contemporary Romance. She loves infusing hope into her stories of broken people. She’s addicted to reading and chocolate. Her idea of a vacation is visiting historical sites and an ideal date with her hubby of almost fifty years would be a live theater performance. Visit her on her website or on Facebook.

Angelina’s Resolve

Architect Angelina DuBois is determined to prove her worth in a male-dominated profession by building a town run by women, where everyone is equal, and temperance is in the by-laws. Contractor Edward Pritchard must guard his heart as he works with the beautiful, strong-willed yet naïve Angelina. He appreciates her ability as an architect, but she frustrates him at every turn with her leadership style. When the project is completed, will it open doors for more work or make him a laughingstock? Can two strong-will people appreciate their differences and embrace their attraction as they work together on to build their town?

A Humble Thanksgiving Meal for the Ingalls

by Sandra Merville Hart

I recently read On the Banks of Plum Creek by Laura Ingalls Wilder. Her family moved to Minnesota when she was seven and first stayed in a sod house built into the creek bank. The details of everyday life in the 1870s fascinated me.

The Ingalls family was very poor. They had moved into the sod house too late to plant crops so finances were tight. The author described the family’s Thanksgiving meal.

Cooking was challenging because there wasn’t a fireplace in the sod home. Their small stove didn’t have an oven.

Her pa had shot a wild goose for their supper that her ma cooked into a stew. She also made dumplings that were cooked in the gravy.

The family ate mashed potatoes and corn dodgers (hearty cornmeal bread similar to corn muffins) served with butter and stewed dried plums. Milk was their beverage.

What grabbed my attention is what they did to remember the humble meal of the Pilgrims before the Native Americans helped them.

Three grains of parched corns sat beside each tin plate, a tradition that reminded them that’s all the Pilgrims had to eat on the long-ago day. How their new neighbors changed the course of their lives that day! There was much to be grateful for.

Laura considered the corn a treat as she thought of the Pilgrims. It was crunchy and brown. The sweet taste crackled on her tongue as she ate it.

I love learning about long-forgotten holiday traditions. Some of them find a home in my historical novels. 😊

Sources

Wilder, Laura Ingalls. On the Banks of Plum Creek, HarperTrophy, 1971.

Corn Dodgers Recipe

by Sandra Merville Hart

I recently read On the Banks of Plum Creek by Laura Ingalls Wilder. Her family moved to Minnesota when she was seven and first stayed in a sod house built into the creek bank. The details of everyday life in the 1870s fascinated me.

The Ingalls family was very poor and often ate corn dodgers. In fact, the author mentioned them so often that I searched for a recipe.

As I suspected, they are similar—yet different—to corn muffins. These are baked on a cookie sheet in mounds.

I had some coarse ground cornmeal that I used to make this recipe, which I believe is more authentic to the times than the finely ground cornmeal we all know.

Preheat oven to 400 degrees.

Mix together 2 cups cornmeal, 1 teaspoon of salt, and a tablespoon of lard (I used vegetable shortening.)

Pour 2 cups of boiling water into the cornmeal mixture and stir well. The batter is thick but if you have trouble stirring it, add a little more water.

Prepare a cookie sheet, well-greased with shortening or butter or use cooking spray.

Scoop the batter into mounds on the cookie sheet. The center of the dodgers is “quite high.”

I used 1/3 cup of batter for each one to make 6 dodgers.

Bake about 25 minutes until lightly browned.

I really liked these dodgers. They’re heartier than corn muffins and more filling. We ate them as a side with soup for supper. It was a nice change from cornbread and biscuits.

These took only about five minutes to put together—and most of that was waiting for the water to boil! It’s quick and easy and a bit of a novelty because, well, I’ve never eaten one before. Maybe it’s a new recipe for you, too!

Sources

Compiled from Original Recipes. Buckeye Cookery and Practical Housekeeping, Applewood Books, 1877.

Mom’s Macaroni Salad Recipe

by Sandra Merville Hart

Sometimes I long for my mother’s cooking. In the summer she often made macaroni salad. She served it in a special, tall glass bowl that was only used for this salad.

The recipe is easy and no one ever wrote it down to my knowledge so I’m sharing it here.

We attended a family reunion where my aunt brought macaroni salad. As I went back for another spoonful, I asked my aunt what made it taste so delicious. She leaned over and whispered, “I put cucumber in mine.”

So, when I made it over the summer, I included her secret ingredient. Amazing tip! It adds another layer of flavor and crunch.

16 Ounces elbow macaroni

½ – 1 green pepper

1 large tomato

1 medium onion

1 large cucumber

1 ¼ – 1 ½ cups mayo

Salt

Cook the macaroni until tender. Drain and set aside to cool. Hint: Stir it a couple of times to release trapped heat and steam.

Chop the vegetables. I only used one half of a green pepper but a whole one doesn’t overpower the salad because there are several vegetables.

I like a lot of tomato in this salad. A large tomato was enough to add vibrant color and flavor.

Once the cooked macaroni begins to cool, stir in the chopped vegetables.

I never measure the mayo when making this salad but I did it this time to tell you. Cooked macaroni tends to absorb the mayo. After adding a cup of it, I spooned it in a bit at a time until it reached the desired creamy texture.

Delicious! The different soft and crunchy textures were even tastier than I remembered.

It may have something to do with my aunt’s secret ingredient. 😊

Homemade Granola Bars

by Sandra Merville Hart

I was looking for a new dessert or snack to take to a family reunion. An easy-to-hold dessert is the one most folks tend to grab at picnics. Pies and cakes are delicious but don’t fit this description. Cookies are my old standby so I wanted to steer away from them.

Then I discovered a recipe on the Food Network for homemade granola bar treats from Molly Yeh. I enjoy watching her show “Girl Meets Farm” and was excited to try it.

I followed the recipe that included some choices. I chose sweetened condensed milk over coconut milk.

Molly leaves the nut or seed butter up to the cook but has her preferences. I used almond butter instead of cashew butter or tahini—a delicious choice!

Her recipe calls for quick-cooking oats. I had the old-fashioned whole grain oats in my pantry so I used those.

I used roasted cashews, almonds, and peanuts.

These are delicious! Chewy. Packed with healthy ingredients. Filling—one bar is all you need.

This was the first time I made these treats. Next time I will give the cashews a quick chop before adding them. I’ll also try the quick-cooking oats, which I believe will hold together better.

I will definitely make these again. Enjoy!

Sources

Yeh, Molly. “Homemade Granola Bar Treats,” Food Network, 2021/08/20 https://www.foodnetwork.com/recipes/homemade-granola-bar-treats-8032610.

Irish Brown Bread

Welcome to friend and fellow author, Cindy Thomson. She has written Irish historical novels and nonfiction Irish books. I read her latest book, Celtic Wanderings, and loved this devotional book! She is sharing a recipe for Brown Bread. Welcome to Historical Nibbles, Cindy!

by Cindy Thomson

I have a fascination with the history of Ireland and the Celtic nations. My latest book, Celtic Wanderings, is inspired by the early Celtic Christians. It’s a devotional that I hope will guide readers along that wandering path we all must traverse in life. My first published novel, Brigid of Ireland, is my interpretation of the early life of one of Ireland’s patron saints (along with Patrick and Columba).

At one of my first appearances at a book club, the hostess had attempted to make food pertaining to the novel. She said she found that challenging. After all, we are talking about the 5th century! Many people in Ireland celebrate St. Brigid’s Day by making brown bread, so I think that’s a good choice. They ate bread back then as they do now, with lots of butter (Kerrygold)! Add a cuppa of strong Barry, Lyon’s, or Bewley’s tea and that’s about as Irish as it gets!

Irish Brown Bread

1 ⅓ cups all-purpose flour

½ Tbsp. baking soda

1 tsp. kosher salt

¾ cup wholemeal flour (you can use whole wheat or look for the authentic stuff online)

½ cup rolled oats

¼ cup steel cut oats

2 ¼ cups buttermilk

Preheat oven to 400 degrees.

Grease 8-by-4-inch loaf pan.

Sift all-purpose flour, baking soda and salt.

Add remaining dry ingredients and mix with pastry cutter or with hands.

Add buttermilk and mix with hands but try not to overwork the dough or it may become tough.

Pour into loaf pan and sprinkle with 1 teaspoon rolled oats.

Place in oven, bake for 20 minutes, rotate and bake 20 more minutes.

Allow bread to cool before slicing. Keep remaining bread refrigerated.

About Cindy Thomson

Known for the inspirational Celtic theme employed in most of her books, Cindy Thomson is the author of six novels and five non-fiction books. A genealogy enthusiast, she writes from her home in Ohio where she lives with her husband Tom near their three grown sons and their families. Visit her online at CindysWriting.com

Celtic Wanderings: Daily inspiration from ancient Celtic voices.

Inspired by stories of ancient Celtic saints, this devotional will guide you and inspire you along the often winding path of life. Structured to be flexible to fit the natural flow of your day or evening, offering both challenge and wisdom, this devotional makes a great gift for others and for yourself.

Purchase her books!

Generational Pie Crust Recipe

Cindy Ervin Huff, fellow author in “The Cowboys,” shares a family recipe that’s been passed down for generations. She also has a new historical romance book release that I loved! Welcome back to Historical Nibbles, Cindy!

by Cindy Ervin Huff

This recipe has been in my husband’s family for generations. It makes four crusts or several tarts.

Back in the day this recipe was created, the perfect pie crust was the envy of every homemaker. Pies were more often made than cakes. Like the little girls in my historical romance Rescuing Her Heart, they learned to make pies at an early age. Even I remember having tiny pans as a child and my mother helping me make a pie.

It was this recipe from my mother-in-law’s family that made my flaky, delicious crusts something to be proud of. I imagine my heroine Delilah James in Rescuing Her Heart used a similar recipe  when baking pies for her bakery.  

Bakers often kept recipes in their heads so no one could steal them. They measured by sight … a pinch of this, a handful of that.

A cup was not always the same depending on the tea cup one used. Standard measuring cups were slow to appear in every homemaker’s kitchen in the 1800s. Some recipes or receipts as they were often called only listed ingredients, like this one. Others gave detailed directions. Note there is no temperature listed either. Women learned from their mothers or grandmothers how to shape the dough and its various uses and how hot the oven needed to be.

This dough is good for fried pies too. Modern stoves with consistent temperatures made successful pie crusts so much easier.

Foolproof Pie Crust

Mix together in a bowl with a fork:

4 cups flour

1 ¾ cups vegetable shortening (Crisco, or Margarine, older recipes used Lard)

1 tablespoon sugar

2 teaspoons salt

In a second bowl beat:

1 tablespoon vinegar (I used apple cider)

1 egg

½ cup water

Combine and stir until moist.

My mother admired my pie crusts so much my husband made her plaque for her kitchen with the recipe on it!

About Cindy

Cindy Ervin Huff is an Award-winning author of Historical and Contemporary Romance. She loves infusing hope into her stories of broken people. She’s addicted to reading and chocolate. Her idea of a vacation is visiting historical sites and an ideal date with her hubby of almost fifty years would be live theater.

Visit her at her blog.

Rescuing Her Heart

As her husband’s evil deeds haunt a mail-order bride from the grave, can she learn to trust again and open her heart to true love? Jed has his own nightmares from a POW camp and understands Delilah better than she knows herself. Can two broken people form a forever bond?

Fresh Banana Cake

by Sandra Merville Hart

I had a few bananas that I needed to use when someone mentioned their mother’s banana cake. My mom didn’t make banana cake but I found a recipe in The Fannie Farmer Cookbook.

Tip: This recipe calls for 2 cups of cake flour. If you don’t have any on hand, you can easily make it. For every cup of all-purpose flour, use 2 tablespoons less of flour in the recipe.

Preheat oven to 350 degrees Fahrenheit.

Prepare a 9 x 9 cake pan with cooking spray OR butter and lightly flour it. I cut parchment paper into 2 strips to provide handles for easier removal of the baked cake.

Mash 1 cup bananas (about 2 medium bananas) and set aside.

Sift 2 cups cake flour into a separate mixing bowl with 1 teaspoon baking soda and ½ teaspoon salt. Set aside.

Cream ¼ cup butter with a mixer. Slowly blend 1 ½ cups sugar into the butter until the mixture is light and blended.

Add the banana, 2 eggs, and 1 teaspoon vanilla to the sugar mixture. Beat well.

Add in the flour mixture a bit at a time, beating as you add until it’s all blended in well.

Fold in ½ cup sour milk OR sour cream gently until blended. (I chose sour cream.)

Pour into the prepared cake pan and bake 40 – 45 minutes, until a toothpick inserted in the center comes out clean.

Cool at least 5 minutes in the cake pan and then turn it out onto a rack. Allow the cake to cool and then cut it in half to make a two-layer cake. Fill it with Banana Cream Filling and ice it with Portsmouth Frosting.

The banana flavor comes out strongly in this delicious cake. The cake itself is good but when combined with the banana filling and creamy icing, it’s delicious. I even ate it for breakfast!

While neither the cake, filling, or icing took a long time to prepare—minutes for each one—baking the cake, allowing it to cool before creating two layers, and then adding the filling before frosting probably took 3 hours.

Enjoy!

Sources

Revised by Cunningham, Marion and Laber, Jeri. The Fannie Farmer Cookbook, Alfred A Knopf Inc., 1983.