Choosing the Right Type of Wood for Cooking on Old-Fashioned Wood Stove

open-fire-885860_960_720

Old-fashioned wood burning stoves cook all types of meals. Fry chicken, bake a cake, or simmer a beef stew for hours. According to the author of Old-Fashioned Woodstove Recipes, there are some secrets to on the road to success that our ancestors understood very well.

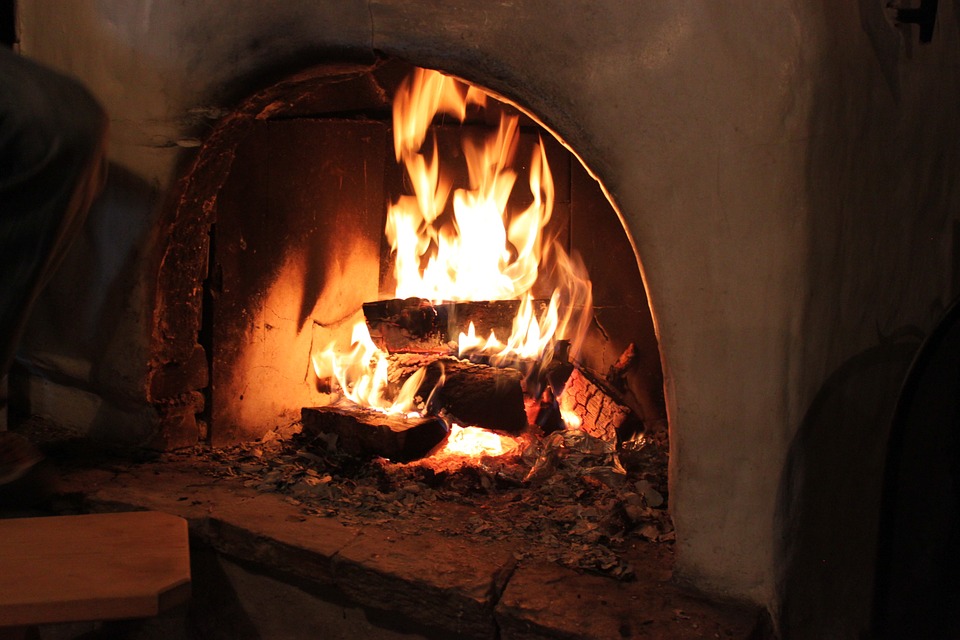
Cooking on a Woodstove requires learning how to build and maintain different kinds of fire.

Old recipes often reference cooking something in a “moderate” oven or over a quick, hot fire. This was a bigger clue to the cook than I imagined.

For example, grilled cheese, bacon, or French toast require a quick, hot fire, a fire that ignites quickly. To create this type of fire, cooks selected birch, pine, or sassafras wood. The temperature increases rapidly to a peak and then dies.

Hickory, dogwood, black locust, white oak, red oak, and fruit woods creates hot slow-burning coals that burn steadily. Maintain baking temperature by using one of these woods to avoid refueling during baking. Adding more wood lowers the temperature causing the cake to fall or the bread not to rise.

Make fires for baking, simmering, or stewing an hour ahead to allow oven to reach the required temperature. Adjust the draft and damper to find the perfect heat. This appears to be a trial-and-error process until the cook learns the individual peculiarities of a particular stove.

Add trivets or racks to the stove burners (cooking lids) to decrease the heat under a kettle. More than one trivet can be used. Bricks also work well.

-Sandra Merville Hart

Sources

Collester, J.S. Old-Fashioned Woostove Recipes, Bear Wallow Books, 1988.

Making Hot Chocolate from Scratch the Old-Fashioned Way

hot-chocolate-1058197_960_720

The authors of an 1877 cookbook wrote instructions for preparing hot chocolate. There is no mention of adding sugar so it seems they drank unsweetened hot chocolate. I’m sure this was healthier but doesn’t sound tasty.

Here’s the recipe:

Dissolve six tablespoons of scraped chocolate or three tablespoons of scraped chocolate and three tablespoons of cocoa in a quart of boiling water. Bring the chocolate mixture to a hard boil for fifteen minutes.

Add one quart of milk. Heat to scalding, then serve while hot. This serves six.

I decided to make hot chocolate the old-fashioned way.

I used Baker’s Unsweetened Baking Chocolate, boiled in water for fifteen minutes, stirring occasionally. The water thickened to a thin gravy consistency and may have been much thicker had it boiled longer.

I added milk and heated the mixture to scalding, stirring frequently to prevent it from sticking to the pot.

The drink looked very tempting. Though I don’t even like unsweetened tea, I tried it. In my opinion, hot chocolate tastes better with sugar. I added a teaspoon of sugar. Much better but not sweet enough for my taste.

I ended up adding two and a half teaspoons of sugar to my mug of hot chocolate.

I think this would be a fun activity with your children or at a fall party when the weather cools. It will be fun to see how much sugar/sweetener that each person requires for the perfect cup of hot chocolate.

-Sandra Merville Hart


Sources

Compiled from Original Recipes. Buckeye Cookery and Practical Housekeeping, Applewood Books, 2011.


Making Coffee from Scratch the Old-Fashioned Way

coffee-744157_960_720

The authors of an 1877 cookbook wrote instructions for preparing coffee. I’m sure the recipe was easily understood by women of their era, but I had to read it several times.

Grind roasted coffee beans. Many people owned coffee grinders similar to the one in the photo. Turning the crank grinds the roasted beans. The grounds are collected in the drawer beneath the grinder. Some grinders attached to the wall.

Allow one heaping tablespoon of ground coffee per person and “one for the pot.” Mix the grounds with an egg (part or all of the egg) with enough cold water to moisten it thoroughly.

Boil a pint of water per person less one pint. For example, if ten people are drinking coffee, use nine pints. (If you find this confusing, read the original recipe!)

Place the prepared coffee grounds into “a well-scalded coffee-boiler.” (This may refer to a coffee pot that has been rinsed in hot water, but that’s just a guess.) Then add half the boiling water to the coffee pot.

Stop up the “nose” or spout with a rolled-up cloth to lock in the flavor. Boil for five minutes “rather fast,” stirring as the mixture boils up. Then simmer for ten to fifteen minutes.

Add the remaining boiled water to the coffee when time to serve.

The cookbook authors advise that boiling coffee a long time makes it strong but isn’t as flavorful as when following the above instructions.

Any coffee drinkers care to give this a try?

-Sandra Merville Hart

Sources

Compiled from Original Recipes. Buckeye Cookery and Practical Housekeeping, Applewood Books, 2011.


Roasting Coffee Beans the Old-Fashioned Way

coffee-642164_960_720

The authors of an 1877 cookbook urged readers to buy raw coffee grains or small amounts of freshly roasted beans. They preferred Mocha and Java or a mix of the two flavors.

Wash raw coffee beans. They can be dried using a moderate oven (probably about 350 degrees) and then increase temperature to roast them quickly, stirring often. The beans are ready when tender, brittle, and a rich dark brown color.

To test doneness, press one bean with your thumb; it will crumble if done.

Coffee beans can also be roasted on a stove burner but make sure to stir constantly.

Add a lump of butter to the hot, roasted beans or let them cool and stir in a beaten egg. This clarifies the coffee beans.

Clarifying coffee was a new term for this modern girl. A little research showed that clarifying liquids removed sediments. Egg whites are most commonly used. After simmering a few minutes, the beans are strained.

This was probably a common task in the 1800s so it didn’t require explanation. I’m guessing early cooks used egg whites to simmer the beans and then strained them before storing in a tightly-closed tin.

The authors cautioned them to only grind quantities needed to retain the fresh flavor.

Next time we will learn how they made coffee.

Stay tuned!

-Sandra Merville Hart


Sources

Compiled from Original Recipes. Buckeye Cookery and Practical Housekeeping, Applewood Books, 2011.


Early American Recipe for Boston Brown Bread

bread-1206636_960_720

The recipe below is an example of measurements in the 1800s.

Notice that a heaping coffee-cup of corn meal isn’t an exact measurement to modern cooks. Civil War soldiers cooked their supper in tin coffee cups, so it had to be much larger than our normal eight-ounce cup. Knowing soldiers used these cups as a cooking pots makes it likely they held over sixteen ounces.

You may also notice that two cups of sweet milk are required, not two coffee-cups of milk, so they used different measurements that cooks of the time understood.

1 heaping coffee-cup of corn meal

1 heaping coffee-cup of rye meal (rye flour may be used)

1 heaping coffee-cup of Graham meal

2 cups molasses

2 cups sweet milk

1 cup sour milk

1 dessert-spoon soda

1 tea-spoon salt

Sift the three types of meal together well. Add the rest of the ingredients and beat thoroughly. The mixture may appear too thin, but it isn’t. Pour the mixture immediately into a tin form that allows room for the bread to swell and place it in a kettle of cold water. Boil for 4 hours. (In the late 1800s, some homes had cook stoves. Others still cooked meals in the fireplace.)

Don’t allow the water to boil over the tin form and make sure to replenish the water as it boils away.

After the bread has boiled, remove the lid and set it in an open oven for a few moments to dry the top.

Serve it warm with Thanksgiving turkey. The bread may also be used as a pudding and served with a sauce made of thick sour cream, sweetened well, and seasoned with nutmeg.

This recipe calls for Graham meal, cornmeal, and rye flour. Graham flour, a coarse whole wheat flour, is available today, but it’s not clear if Graham meal is the same product. 

Modern recipes often call for flour, whole wheat flour, and cornmeal. Other Brown Bread bakers use whole wheat flour, rye flour, and cornmeal.  

I haven’t tried this recipe yet. I’m not sure what to use for a tin form these days. Some village museums may sell this type of pan. Internet searches suggest springform pans.

Recipes from the 1800s and earlier were written in paragraph form, making them much harder for today’s cooks to decipher, but it’s a lot of fun to try. 

Your comments are welcome!

This recipe is from Mrs. H.S. Stevens, Minneapolis, Minnesota in the referenced source.

-Sandra Merville Hart


Source

Compiled from Original Recipes. Buckeye Cookery and Practical Housekeeping, Applewood Books, 2011.